This guide is only for UE5 versions of Survival Game Kit V2
Before following this guide I recommend following the guides linked below
https://defusestudios.com/sgk-v2-added-crouch-camera-transition/
https://defusestudios.com/sgk-v2-replaced-aim-point-components/
Before following this guide make a backup of your project, if you’ve changed your character mesh to one with a different skeleton after following this guide you will have to go though the retargetting process again.
This guide involves replacing the animations blueprints so if you have modified or replaced those blueprints or changed the character’s mesh setup you may have issues after following this guide that you will need to resolve.
Start by going to the BP_SGKAnimationInterface and copy the video below.
Next open the BP_SGKHoldableInterface and copy the video below.
Next open the SK_Mannequin in the Content Browser, if your using a custom character skeleton go to that characters skeleton instead then copy the video below, make sure you copy the socket names exactly.
Then open the BP_MasterHoldable blueprint and copy the video below, then compile and save.
Then open the BP_MasterRangeWeapon and copy the videos below.
Next save your project and close it, then you will need to go to the Epic Launcher and create a new Survival Game Kit V2 project, select the same engine version your project uses, we will be copying files from the new project into yours.
Copy the video below to copy the files from the new project to yours, make sure you’ve made a backup of your project!
Now you can open your project, then open the ABP_Thirdperson_Anim blueprint, if you have any errors you may have not copied one of the files correctly so you’ll need to double check the video above.
Next go to the BP_SGKMasterCharacter and copy the video below.
In the video below we set the anim blueprint for the character meshes and add important component Tags, if your using a custom character skeleton these anim blueprint wont work correctly. You will need to replace them with retargetted versions after finishing this guide.
Next go to the BP_MasterHoldable and copy the video below.
Next go to the BP_CharacterComponent and copy the video below.
Now you will need to go to each holdable blueprint and set their Animation Layer so they know which anim layer to use when held, go to the Blueprints/Items/HoldableItems folder and copy the video below.
If you have new holdable items that you’ve added to the project there will be a guide linked at the end of this guide on how to setup new anim layers for those holdables.
Next go to the ItemList you will need to go to the follow items rows M4A4, M1982, P1911, Axe, Pickaxe, Knife, Building Plan, Hammer, Flashlight, Grenade, Building Plan and in their Holdable Details replace the Equip and Unequip AM_Equip_Item montages with the AM_Equip_Unarmed montage.
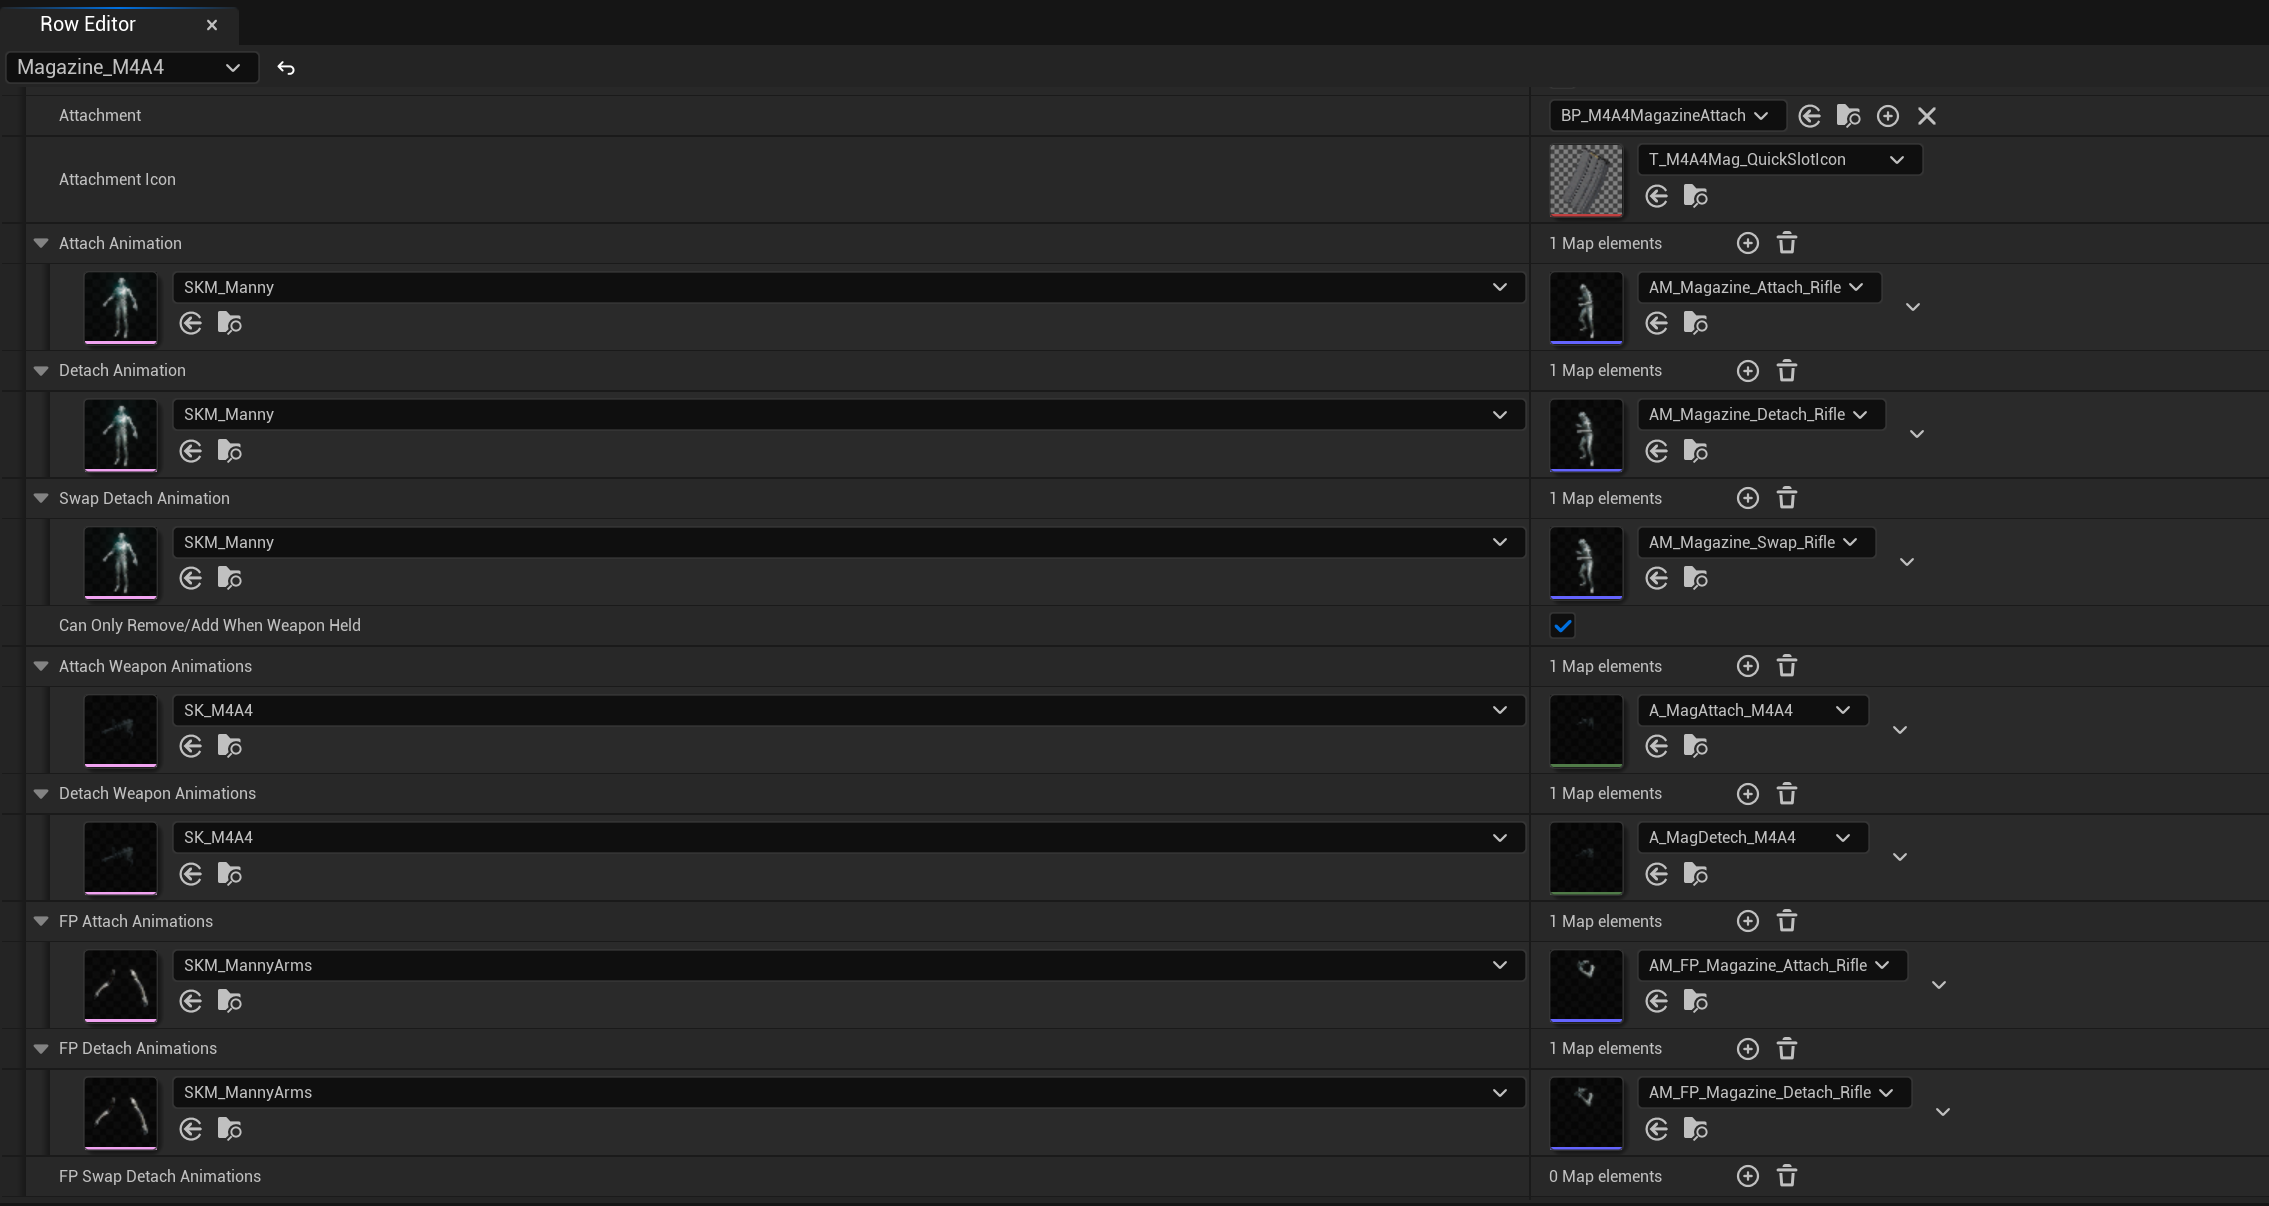
Then go to the Magazine_M4A4 row and replace your current montages in the Attachment Details with the ones shown in the image below.
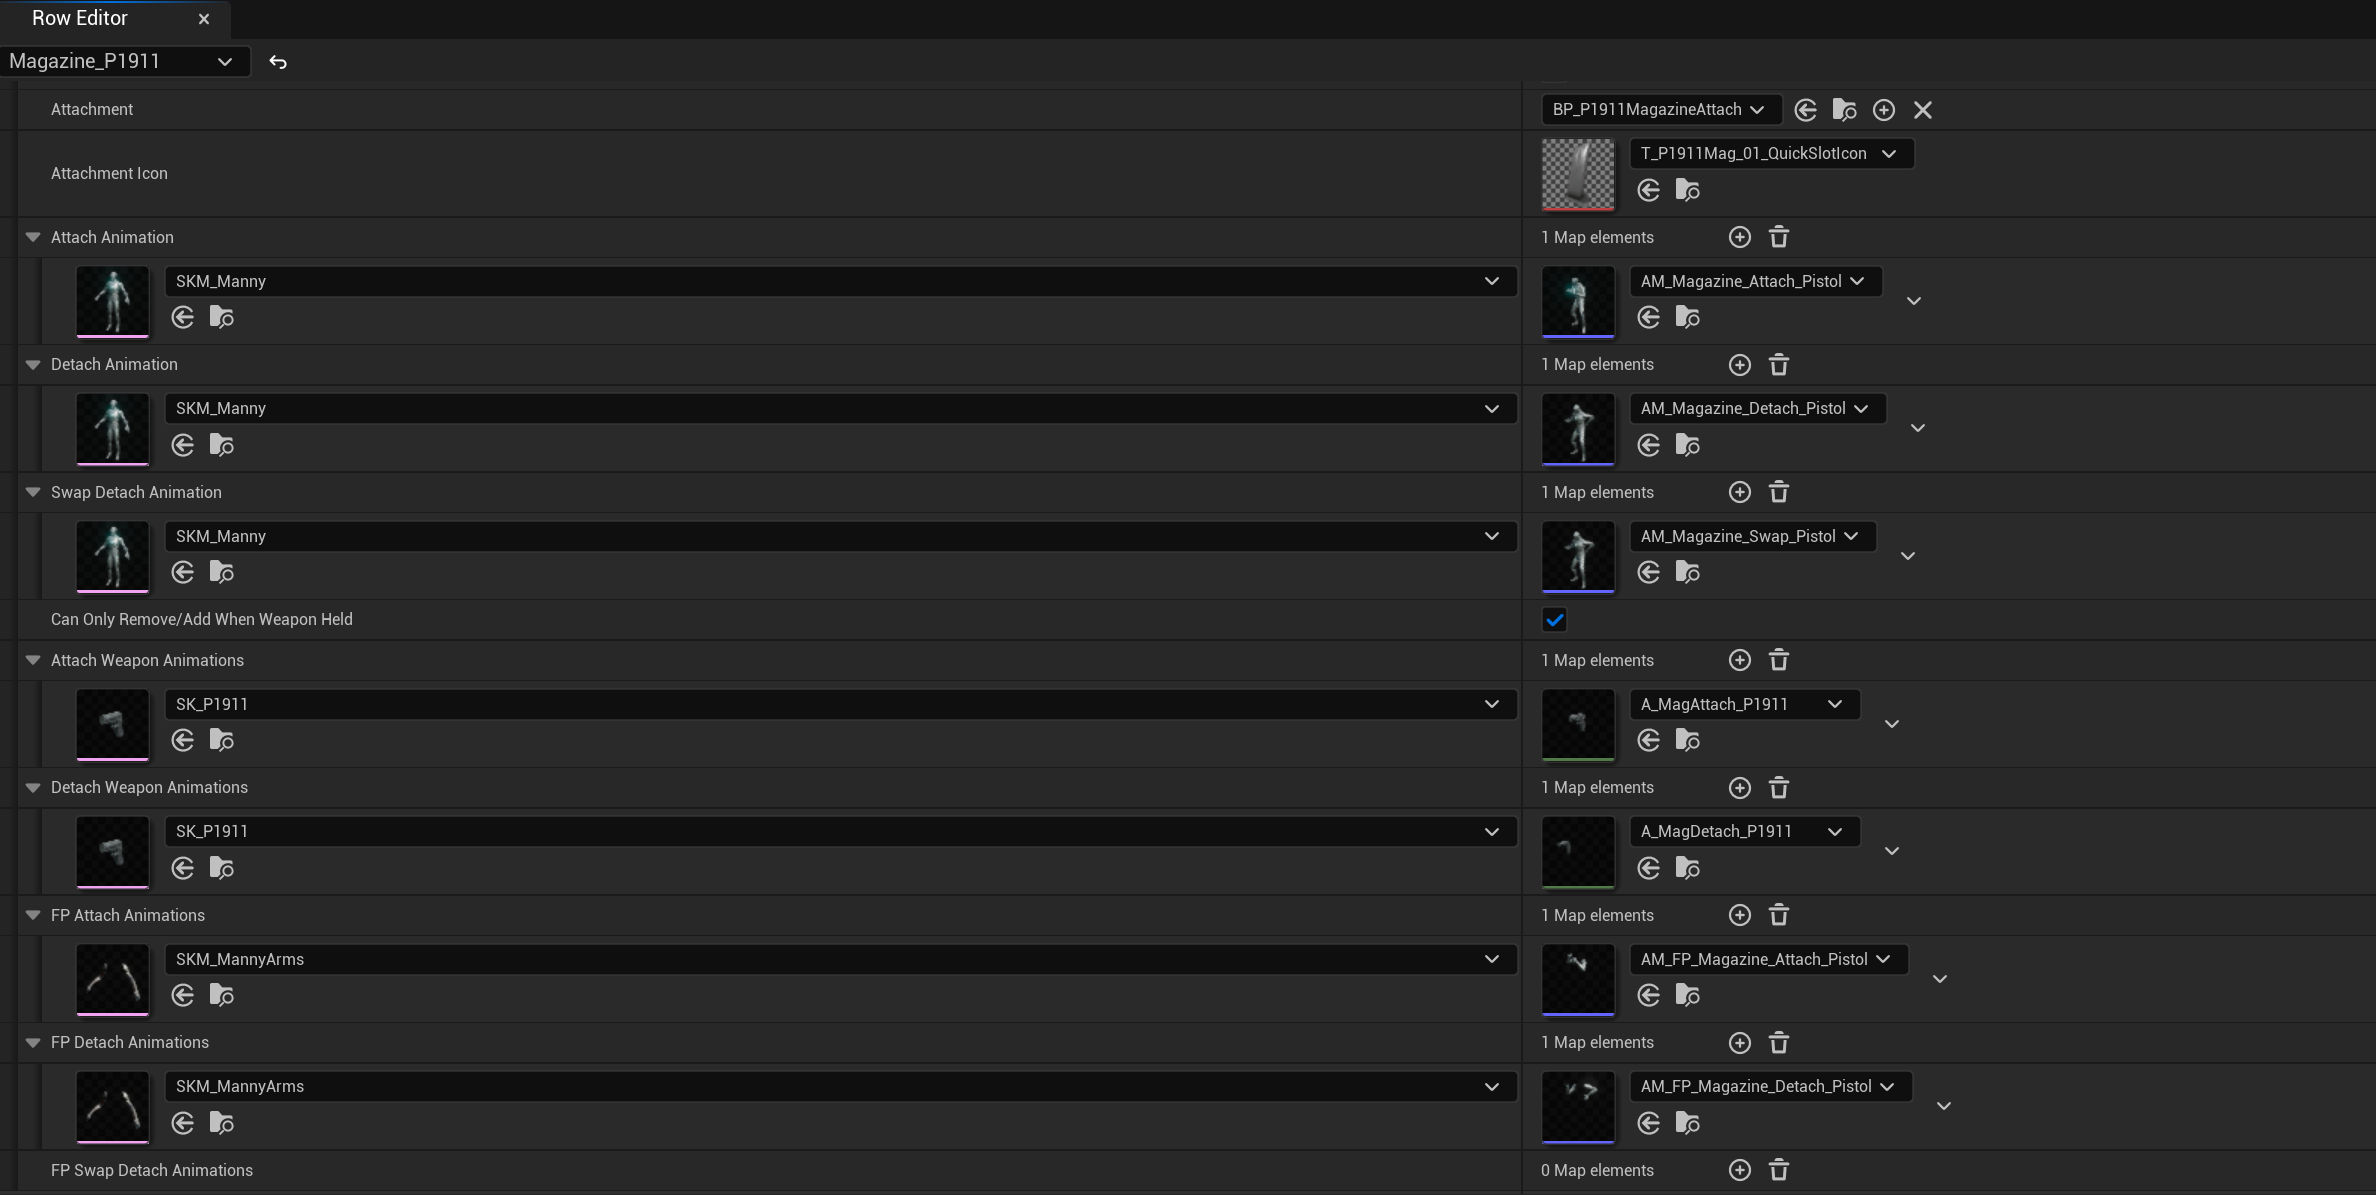
Then go to the Magazine_P1911 row and replace your current montages in the Attachment Details with the ones shown in the image below.
Next go to the BP_M4A4 and in the Class Defaults set the Character Fire Animation to the AM_Fire_Rifle.
Then set the Character Chamber Animation to AM_Chamber_Rifle
Next open the BP_P1911 and in the Class Default set the Character Fire Animation to the AM_Fire_Pistol
Next go to the BP_M1982 and in the Class Defaults set the Character Fire Animation to the AM_Fire_Shotgun
Then set the Character Chamber Animation to AM_Reload_Shotgun and set the FP Character Chamber Animation to AM_FP_Reload_Shotgun
Next go to the BP_MasterMeleeWeapon and in the Class Defaults replace the AM_MeleeAttack_01 montage in the Melee Attack Animations to AM_Melee_Attack_01 montage
Next go to the BP_Knife and in the Class Defaults replace the AM_MeleeAttack_02 montage in the Melee Attack Animations with the AM_Melee_Attack_01 montage
Next go to the BP_MasterThrowable and in the Class Defaults change the Throw Montage setting to the AM_Throw_Grenade montage, you will have 2 of these montages in your project, make sure you select the one from the Montages/Grenade folder.
In the Content Browser go to the Animations folder, you can now select and delete the BP_FirstPersonArms_Anim, BP_FirstPersonBody_Anim and BP_ThirdPerson_Anim as these blueprint are now no longer used.
Next open the BP_MasterHoldable and copy the video below. Then play in editor to compile the effected blueprints.
Notes
Custom Animations/Montages – If you have custom montages/animations that use the notifies that come with Survival Game Kit V2 those notifies in the montages/animations will need to be replaced with the new versions, to do this go to your montage or animation that the montage uses and right click the notify and use the Replace with Notify option and search for the BP_”the notify name” this will display the new version of the notify that you should replace your current notify with.
Changing Character Animations – https://defusestudios.com/sgk-v2-changing-character-animations-2/
Adjusting Hand IKs – https://defusestudios.com/sgk-v2-adjusting-hand-iks/
Creating New Anim Layers – https://defusestudios.com/sgk-v2-creating-new-anim-layers/
